|
|
|
|
|
|
Rock Climbing
Tips |
|
|
|
|
 |
|
|
|
|
|
|
|
Rock
Climbing Tips —
Beginners and
experts alike
can use these
tips to improve
their climbing
as well as
impress the
onlookers.
If these tips
don’t improve
your climbing as
much as a least
a letter grade,
you can send me
an angry email.
-
Picture
yourself on
a ladder
when you
climb, move
from one
hold to the
next as
relaxed as
if you were
ascending
the rungs or
steps of a
ladder.
-
Avoid over
gripping
holds with
your hands.
You will
quickly tire
your arms
out.
-
Use your
feet like
you would
your hands.
-
Trust your
feet. You
can stand on
your legs
all day. You
don’t hang
with your
arms all
day. Too
often people
hang on
their arms
and then
fall off,
sailing
right past a
monster
ledge they
could have
had their
feet on.
-
Trust your
belayer, and
focus on
climbing. If
you are
worried your
belayer
doesn’t have
you, find a
new belayer
you can
trust.
-
Concentrate
on what is
within
reach.
Sometimes
you can use
an
intermediate
hold (a
smaller hold
between
secure
holds) to
get to a
better hold.
-
Climb from
the bottom
up, not top
down. Of
course, if
you can see
the top of
the route,
look to see
if there is
a pattern
working from
the goal
down to
where you
are, but
when you
start to
climb, focus
on the
climbing at
the bottom
of the route
as you climb
up.
-
Climb in an
X shape with
your hips
being the
middle of
the X. Hang
with your
arm
straight.
Your
skeleton can
take much
more of a
load than
your muscles
can. If the
heel of your
foot is
hanging too
far down you
may notice
your leg
start to
shake like a
“sewing
machine”.
This is very
common
occurrence,
simply apply
more weight
to your toes
so your calf
muscle spasm
can stop.
-
Fear of
heights is
normal.
Climbing is
all about
conquering
those fears.
Time will
cure the
fear of
heights. A
good trick
is to look
down no
further than
your feet to
correctly
place them
on the best
part of the
hold.
-
Take your
time. Climb
like a cat
does—quiet,
deliberate,
and precise.
Picture the
move, and
then execute
it. Use all
of your
limbs, not
just two.
The lower
the angle of
the climb,
the more
time you
have, so use
it. Make
each move as
fluid as
possible
|
|
TOP |
|
|
|
|
|
|
|
|
|
Climbing Ratings — In
the 1950’s a group
called the Sierra Club
modified an old system
which they used to rate
climbs according to
their difficulty. This
system is now called The
Yosemite Decimal Rating
System.
The YDRS breaks climbing
down into classes and
grades. Nearly every
climbing guide uses this
system. Beginning
climbers can use this
system to find climbs
that are challenging but
not too difficult;
preventing them from
venturing out onto
something too hard that
might lead to injury.
All climbing, hiking,
crawling, and so on can
be broken down into
these classes. A brief
explanation of the
classes will describe
what type of climbing
might be encountered.
Class 1:
Walking, on an
established trail.
Class 2:
Hiking, up a steep
incline, possibly using
your hands for balance.
Class 3:
Climbing up a steep
hillside; a rope is not
normally used.
Class 4:
Exposed climbing,
following a ledge system
for example. A rope
would be used to belay
past places where a fall
could be lethal.
Class 5:
This is where technical
rock climbing begins. A
3 point stance (Two
hands and a foot or two
feet and a hand) is
needed. A rope and
protection are needed to
safeguard a fall by the
person leading. Any
unprotected fall from a
class 5 climb would be
harmful if not fatal.
Class 5 climbs are
subdivided into
categories to give more
detail.
5.0-5.4:
Climbing up a ramp or a
steep section with good
holds.
5.5-5.7:
Steeper, more vertical
climbing, but still on
good holds. These routes
are also easily
protected.
5.8 +/-
Vertical climbing on
small holds. A + means
that the climbing is
more sustained like a
5.9, but the route would
still be considered a
5.8. If you see a –
after the 5.8 rating it
means that the climb
only has one or two
moves like a solid 5.8
would have, but more
resembles a 5.7. The +
and – are becoming
outdated and most guide
books have discontinued
their use.
5.9
+/-This
rating means that the
climb might be slightly
overhung or may have
fairly sustained
climbing on smaller
holds. With practice the
beginning climber can
climb in the 5.9 range
quickly and with
confidence.
5.10 a, b, c, d
Very sustained climbing.
A weekend climber rarely
feels comfortable in
this range unless they
do go EVERY weekend or
has some natural talent.
The difference between a
5.10 b and a 5.10 c is
very noticeable. Most
likely the climbs are
overhung with small
holds and are sustained
or require sequential
moves.
5.11 a, b, c, d
This is the world of the
dedicated climber.
Expect steep and
difficult routes that
demand technical
climbing and powerful
moves.
5.12 a, b, c, d
The routes in this range
are usually overhanging
climbs requiring
delicate foot work on
thin holds or long
routes requiring great
balance on little holds.
5.13 a, b, c, d
If you can climb upside
down on a glass window,
these climbs are right
up your alley.
5.14 a, b, c, d
These climbs are among
the hardest in the
world.
5.15 a
This is as hard as
climbing gets, folks.
Keep in mind that very
few climbers can
actually climb at this
level, although
Spiderman eats these
climbs for breakfast.
Climbs are rated by the
hardest move on the
route. A person who is a
solid 5.8 climber
theoretically should be
able to climb through
the crux (the hardest
part of the climb) on
any route rated 5.8
regardless of the type
of rock or area they
climb at. That is the
theory anyway.
Unfortunately, climbs
are not rated by a
committee of climbers so
a particular climb can
be off as much as a
letter grade or more.
Having said that, the
majority of climbs you
will do will be right on
the money.
Since the destiny of
every mountain, cliff,
boulder, or pebble is to
become like the gravel
you walk on to get to
the climb, know that ALL
RATINGS ARE SUBJECTIVE!
Weathering of the rock,
the sun, wind and
extreme temperatures all
contribute to making
climbs harder or easier
than the rating given to
a climb the first time
it is established.
While routes are given
ratings so you don’t
bite off more than you
can chew, try climbing
at your level and then a
little bit more. You
might surprise yourself
and actually get up the
route in relatively good
form.
If you are having
trouble with a
particular climb, don’t
blame the rating. Train
a little harder, do a
few extra pushups at
night, and give it a go
again. Climbing is about
setting goals and
working to achieve them.
The last rating class of
the Yosemite Decimal
Rating System is class
6, which is considered
aid climbing. Aid
climbing has its own
rating system that does
not use decimals like
class 5. Instead it uses
A to abbreviate Aid and
then a number which
indicates how
challenging the moves
are and the commitment
level involved on the
climb.
|
|
TOP |
|
|
|
|
|
|
|
|
|
Rock Climbing Shoes —
Climbing shoes are the
most important
investment you can make
as a climber. In order
to reach your highest
climbing potential, you
need to get the right
shoes for your feet.
Shoes are the most basic
equipment for every
climber from the
bare-bones minimum
boulderer to the gear
laden big wall climber.
You might want to
consider making them
your first gear
purchase.
Today’s climbing shoes
are scientific wonders
compared to the antique
shoes of a decade ago.
Sophisticated sticky
rubber, cushioned soles,
synthetic leathers and
anti-fungal treatments
are just a few of the
many options available
for you to choose from.
To begin, you need to
understand how a
climbing shoe is made,
and then you can find
one that fits your foot.
That’s right, not every
shoe was made for your
individual foot, so
let’s turn away from all
the glitter and smoke
and look inside the
shoe.
Climbing shoes are made
around a “last.” A last
is a piece of wood or
plastic shaped like a
foot, much like a
mannequin’s foot that
models sandals in a shoe
store. Shoe
manufacturers take that
last and sew the inside
of the shoe around it.
That shell is covered
with the outside leather
of the shoe and then the
sole is glued on, laced
up and put on your foot.
Every manufacturer of
climbing shoes has their
own set of lasts. Some
are shaped like your
feet, others like your
climbing partner’s feet.
To find the right shoe
to fit your foot, you
have to try a bunch on.
When you are just
learning how to climb
you will want a “board
lasted” shoe. This is
just what it sounds
like, the soles on these
types of shoes are quite
stiff allowing the
beginner to learn how to
edge and smear.
Once you teach your feet
how to move you can get
a shoe with a more
supple sole that will
allow you to feel those
miniscule holds under
your pinky toes.
However, you’ll want to
keep those hard soled
kickers around if you
ever do a multi-pitch
climb—your toes will
thank you for the
breathing room.
Make sure you go to a
quality rock climbing
store to try on climbing
shoes. Be patient and
take your time. Listen
to the sales person,
they will help you.
Beware of stores that
don’t have at least some
small holds for you to
practice edging on. You
can’t get a feel for
your shoes if you don’t
try them on and practice
edging in them. Try on
at least three different
brands before buying,
because again, every
manufacturer uses a
different last.
When you lace up your
shoes for the first
time, leave room to lace
them tighter. As you
break in your new shoes
the material will
stretch and you’ll need
some room to tighten the
laces. Slippers (shoes
without laces) are not a
recommended starting
pair of shoes, though
most boulderers and gym
climbers prefer them for
the ease of a quick on
and off. Shoes with
laces allow you to
tighten them in
different places to dial
in a perfect fit. Don’t
let your friend talk you
into a certain brand of
shoes unless your feet
are identical twins of
his feet, though you
might find a different
model from the same
company that will fit
your foot.
Finally, take care of
your new shoes and
they’ll last you a long
time. Leaving them in
the back of your car on
a hot summer day or by a
camp fire can make the
soles come unglued. Dirt
and mud will make your
feet skid on holds, so
take a tarp or crash pad
to launch off of onto
the rock. It is best to
fit and climb in your
shoes without socks to
get the sensitivity your
toes need on the rock.
The rewards of properly
fitted shoes are happy
feet for years to come.
|
|
TOP |
|
|
|
|
|
|
|
|
|
Climbing Falls — What
goes up… that’s right —
must come down. Whether
you are just starting
out or you are a pro,
you are going to fall
off of a route
somewhere, sometime (I’m
so optimistic).
Psychologists tell us
that we are born with
two fears: the fear of
loud noises and the fear
of falling. It is a very
natural thing to not
want to fall off a rock
climb, but if you climb,
you will fall. Falling
shows you where you need
to improve. It is a
great motivator to train
harder so you don’t have
to take the drop.
Basically, if you climb
rocks, you will take a
fall sometime and
somewhere. Alright, with
that out of the way, we
can now learn how to
fall in a way that you
will not likely get
injured. First of all,
wear a helmet. Second,
anticipate when on the
route you will most
likely fall. As you look
up at the route, you can
usually tell where the
crux will be; a
prominent overhang, a
spot without many
features (climbing
holds), etc.
Keep in mind that as you
fall you won’t always be
traveling straight down.
Traversing (moving
horizontal to the last
place you clipped in the
rope) will create a
pendulum effect with the
fall. Falling on an
overhang will send you
down and back into the
rock. And falling onto a
ledge, a bulge in the
route or the ground,
will be damaging to the
feet and legs. So make
sure you communicate
with your belayer ahead
of time so you both
understand how much
slack to have in the
rope at that critical
part of the climb.
If you are on a sport
climb, most of the time
the route developer has
engineered the route so
a bolt or two will be
right at the crux
protecting the fall. As
long as you don’t have
too much slack in the
rope, you should be
fine. But remember, the
more rope you have out
the softer the catch
will be. Any falls near
the first couple of
bolts are hard on a
rope. So if at all
possible, switch ends of
the rope after a
substantial fall or give
the rope a few minutes
to recover from the
stretch.
Finally, as you fall,
stay calm (Yeah right!).
Keep your body loose and
be ready to absorb the
impact. Put your arms in
front of you, your palms
to the rock and as you
connect make sure you
don’t hit your head.
Your feet should hit the
rock first. Keep your
knees bent and toes
pointed up, move into
the fall, and use your
legs as a shock
absorber. The more you
successfully fall the
more natural it will
get. What a rush! |
|
TOP |
|
|
|
|
|
|
|
|
|
With the popularity and
increased access to
climbing, fingerboards
are becoming a second
line method of training.
However, we feel that
there are some great
advantages to the
convenience and
specificity of training
boards. Having a board
mounted in a doorway to
a spare room or your
garage makes it easy to
schedule a quick workout
if a little time is all
you have. The specific
nature of fingerboard
training enables you to
gauge your progress much
more effectively than
bouldering at the rock
gym or your home wall.
It is easier to control
if and when you fail
doing a set exercise on
a particular hold on a
board, than if you are
desperately thrutching
for the last hold on
your latest plastic
bouldering test-piece.
This factor will
hopefully permit you to
work to your limits
while minimizing the
chance of injury to your
fingers.
Finger training programs
can be difficult to
figure out. Keep in mind
that what you are
strengthening is
essentially connective
tissue, tendons and
ligaments. It takes a
long time to notice
gains in strength in
this tissue and a very
long time to heal once
it has been injured. If
you are using
fingerboard training in
addition to indoor
climbing on plastic, be
aware of how much stress
you are putting on your
fingers and arms, and be
careful to not over-do
your training. If you
start having problems,
allow yourself time to
heal. If problems
continue, specifically
long-term pain and
swelling in your
fingers, consult a
sports-oriented
physician.
The Training
There are two general
categories of exercises
that you can do on your
Metolius training board.
In simple terms, they
are exercises that build
power or exercises that
build stamina
/endurance.
Endurance-oriented
exercises are a set of
tasks that put your
muscles in a more or
less aerobic state; that
is, training your
muscles to function for
extended periods.
They generally are a
longer duration and a
lower load exercises and
you are maintaining a
lower level "burn" in
the muscles than the
pump you get at the
limit of your strength.
Power-oriented exercises
focus on short duration,
higher load tasks that
your muscles can't
maintain for very long.
With these exercises,
you are building
strength (muscle fiber
size ) and the capacity
to recruit more muscle
fibers for short, quick
bursts of movement.
Any of the training that
follows assumes a good
base strength level.
Most of the work or
exercises that follow
are power-oriented for a
couple of reasons:
-
We feel that you can
develop some
endurance from a
power workout, but
you cannot develop
good power from an
endurance-oriented
workout and in fact,
it is best if they
are trained
independently.
-
It is hard both
physically and
mentally, to hang on
a board for the
extended periods
required to totally
target endurance.
The amount of load you
use for each exercise is
up to you to determine.
We feel the most gains
happen if you use a safe
maximum load for the
cycle that you are in.
Try to pick a load that
allows you to barely
hold on for the time
indicated in the
exercise. Load is
determined relative to
your body weight. If you
need to add weight, use
a weight belt. If you
need to reduce weight,
use a chair or step
stool set back from and
under the board that
allows you push with one
leg. Make sure your
other leg stays below
you, so that if you
fall, you land on your
feet. You can use a
bathroom scale on a
chair to give you a more
accurate idea of how
much weight you are
taking off (see
illustration). If you
don't feel safe using
this method, have a
partner lift you
instead.
Use Partners
Partners can check
your time and remove or
add weight as well as
give you assistance and
cheer you on when you're
trying to get that last
bit of effort out.
Having a partner spot
you when training to
absolute failure is
highly recommended.
Setup A Workout
Schedule & Stick To It
Make a chart and use it
to keep track of your
training. If you keep a
detailed record showing
amounts of weight and/or
assistance for each
segment of an exercise,
it will be much easier
to slowly increase your
workload. These records
will help you get the
most benefit from your
training time.
Use Any of the Holds
For Any Exercise
You will probably find
that certain holds are
better suited to certain
exercises than others.
For example, you would
probably do pull-ups on
different holds than
short duration hangs. It
is also important to
look at your weakest
points and train those
first. For example, if
you have a hard time
holding onto sloping
holds, focus your
training there early in
your workouts. It is
also a good idea to
change the holds you use
for a given exercise
every few weeks, to
maximize the
effectiveness of your
training.
Dos & Don'ts
Avoid doing an excessive
number of pull-ups on
your board. A lot of
pull-ups on a static bar
can lead to elbow joint
injuries. If you wish to
do more pull-ups than
our exercises indicate,
we recommend that you
use Metolius Rock Rings.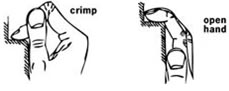
Avoid range of motion
exercises for your
fingers on any training
board. Once you place
weight on a hold do not
attempt to move your
fingers (don't do mini
pull-ups with your
fingers) as this can
lead to injury.
Avoid using crimp or
cling grips. A very
important aspect
concerning any hold is
how you hold on to it.
It is extremely
important that you do
not use any kind of
cling technique
regularly. Because of
the increased angle of
your fingers while
clinging, the load on
your finger joint is far
too high to be safe for
training purposes. We
have found that if you
keep your hand more
open, you will be safer
and still can strengthen
your fingers for both
open-handed and cling
holds. The illustration
pictured shows both
types of holds. Use
chalk when training and
occasionally clean your
board with a nylon brush
to maintain a consistent
surface.
The Tasks
Following are the basic
elements of exercises
that can be done on your
training board:
-
Hangs - either
straight arm or bent
arm, one arm or
both. When hanging
straight, there
should still be a
slight bend to the
elbows.
-
Pull-ups - can be
done with the hands
parallel or offset (
one of your hands on
a higher or smaller
hold than the
other). Offset pulls
put more training
stress on the higher
or smaller hold arm
and can more
effectively simulate
certain climbing
situations.
-
Knee Lifts - Hang on
good holds and bring
your knees to your
chest, bending at
the waist and knees.
This task works the
often overlooked
abdominals for that
solid mid-body
connection.
-
Shoulder Shrugs -
Hang as above and
raise and lower your
body without bending
your elbows. This
exercise works
several different
muscle groups in the
shoulder girdle. As
with pull-ups, we
would recommend
keeping repetitions
low.
Cyclic Periodization
As an overall strategy,
cyclic periodization
allows you to be at your
peak when you want to
be. Whether this
corresponds to a big
road trip or pushing
your limits when the
weather is the best is
up to you. If properly
done chances of injury
and mental burnout are
minimized and gains in
strength and power are
optimized.
The concept is simple;
build a base of
endurance then work
toward maximum power. By
pushing your body in
these cycles you strike
a balance between
letting yourself be
fresh and strong within
the cycles and not
letting yourself totally
adapt to the stresses of
the workouts. This keeps
you from stalling at
different plateaus and
makes the gains possible
much greater than doing
the same sets of
workouts month after
month. Immediately
following the peak cycle
you should be ready to
climb strongly. |
|
TOP |
|
|
|
|
|
|
|
|
|
|
Aid Climbing by
pulling or resting on
gear that is either
placed or fixed into the
rock. This is in
contrast to free
climbing. Aid routes are
also called "nail ups."
A route which requires
aid climbing is rated
grade 6 (free climbing
is rated grade 5, as in
5.10).
Anchor The point
where a climber's rope
is securely attached to
the rock.
Backstep This
foot technique uses the
outside of the shoe on
an edge.
Barndoor A poor
example of balance.When
the climber loses grip
with the hand and foot
on one side and they
fall sideways as if on a
hinge of the opposite
hand and foot.
Belay Use of a
rope to protect a
climber against a fall.
A climber can be belayed
by another person, or be
climbing alone, using an
advanced technique
called a self-belay.
Belay Device A
device used by the
belayer which acts as
the brake on the rope.
Some examples are figure
8's, ATC's and GriGri's.
Bivouac A camp,
or the act of camping.
On a big wall, camp can
be made on a natural
ledge or an artificial
one, generally an
aluminum and nylon
cotlike device called a
portaledge that hangs
from one or more anchors
on the wall. Also called
"bivy".
Bolt Literally a
bolt drilled into the
rock face.
Boulder A style
of climbing which
involves climbing only
at a height the climber
feels comfortable
jumping to the ground.
Bucket A large
hand hold. Feels as
secure as a rung on a
ladder.
Carabiner An oval
or D-shaped link of
lightweight aluminum or
alloy that serves as the
climber's all-purpose
connector.
Chimney A wide
crack that accommodates
(most of) the body of
the climber.
Clean The act of
removing any non-fixed
protection from the
rock.
Crag A climbing
area, usually a cliff.
Crank To pull on
a hold as hard as you
possibly can.
Crater To fall
and hit the ground
pretty hard.
Crimper A very
small hold which allows
only finger tips, if
that.
Crux The hardest
move, or series of
moves, on a climb. The
rating of a climb is
generally that of the
most difficult move.
Deadpoint A
dynamic move which
involves precision
movement in order to
catch the hold at the
peak of the move before
momentum waivers and
gravity starts taking
over.
Edging Climbing
technique when climber
places edge of shoe
precisely on top of a
hold or unconformity on
the rock.The opposite of
smearing.
Figure Eight A
device shaped like an 8
used for belaying and
rappelling.
Free Climbing
using only hands and
feet to move upwards.
Unlike Aid Climbing,
free climbing uses the
rope and gear only as
protection against a
fall, not as a ladder
for upward movement.
This method also
stresses the use of gear
that is temporarily
placed in the rock for
protection by the
leader, and then removed
by the second climber.
Gripped Frozen
from fear.
Haul Bag Large
and robust bag used to
haul food, water,
climbing gear, sleeping
bag, and more up a big
wall. Also known as "the
Pig" since it is
comparable in size and
possibly in weight.
Indoor Public
climbing gyms and
homegrown climbing walls
have been around for
about a dozen years now.
These artifical
environments substitute
the bumps, cracks and
other irregularities
found in natural rock
with a vast assortment
of cast fiberglass
holds. The holds, some
as small as silver
dollars and others as
large as a gallon milk
jugs, are bolted to
plywood walls in random
patterns. The walls
themselves can be sloped
in or out and arranged
to form inside and
outside corners,
overhangs, cracks and
other common climbing
situations.
Jumar is the
method of climbing a
rope using ascending
devices that can be
quickly attached and
then loosened from the
rope. Jumar is the name
of the device (sliding a
knot of rope or webbing
up a rope is called
Prusiking, after Dr.
Karl Prusik); Jumaring
is the act of ascending
the rope.
Layback A
climbing technique where
hands and feet work in
opposition as one scales
a crack or flake.
Mantel A climbing
move which looks like a
small child climbing up
to the kitchen counter.
Hand(s) are on ledge,
one foot comes up, as
you rock over one hand
with your elbow locked.
Mountaineering At
one end of the spectrum,
mountaineering can
include peak bagging,
where little or no
technical skills or
equipment are needed to
reach the summit of a
mountain. It can also
include full-blown
expeditions to the
highest peaks and the
worst weather conditions
on Earth. Generally,
though, mountaineering
adds specialized ice
climbing skills and gear
to those of rock
climbing. Mountaineering
also tends to be
destination oriented.
On-Sight Similar
to flash which means
climbing without any
falls. The difference
being it is the first
time the climber has
ever seen the route.
Pig Also known as
Haul Bag. Large and
robust bag used to haul
food, water, climbing
gear, sleeping bag, and
more up a big wall.
Pitch The section
of rock between belays.
Generally, pitches are
no longer than the
length of the rope (165
feet). Many sport climbs
are set up so that their
anchors are only half
the length of a standard
165-foot rope from the
ground, so that climbers
need only a single rope
in order to be lowered
or to rappel off the
climb.
Quickdraw A pair
of carabiners connected
with a short piece of
webbing. A quickdraw is
used to quickly connect
a climber to a piece of
pro or a permanent
anchor.
Rack The full set
of gear needed to climb
a route.
Rappel Using a
rope to descend from a
climb. Modern rappels
are generally done with
a rappel device, which
creates friction on the
rope to help control the
descent. Also called
abseiling.
Redpoint When a
climber has led a climb
from top to bottom with
out weighting the rope
or gear. Also called a
clean ascent. In the
1980s, German climber
Kurt Albert marked
climbs which he had done
with no falls with a
redpoint at their base.
Sidepull Vertical
slot hand hold which is
pulled on from the side
instead of downwards
like most holds.
Simul-climb When
both the leader and
partner are both
climbing at the same
time, connected by a
rope. This is done on
easy terrain, or if the
rope is too short to
reach a belay. Many
times simul-climbing is
done using a running
belay (the leader places
protection, which is
removed by the second)
rather than fixed
anchors at the end of
each pitch or rope
length.
Smearing Climbing
technique in which the
climber attempts to
stand on the rock by
getting as much friction
as possible between his
shoe and the rock.
Generally this involves
placing the sole or toe
of the shoe directly on
top of the hold or rock
surface, then pushing
and twisting the foot.
The opposite of edging.
Soloing When a
climber ascends without
a partner, rope, or
equipment to protect him
from a fall. A "rope
solo" is when a solo
climber uses a rope to
self-belay. Simul-soloing
is when two climbers
solo together without
the benefit of a rope.
Sport climbing is
different from
traditional in that the
climber depends on fixed
bolts rather than
removable protection.
Sport climbing routes
often follow seemingly
impossible paths,
sometimes straight up
huge, smooth rock walls,
sometimes far out on
horizontal overhangs.
The emphasis in sport
climbing is usually more
on technique than
topping out. Falls are
frequent, though seldom
serious, as climbers
constantly push the
limits of gravity and
ability.
Top Roping
Pre-protecting a climb
from above. The belay
for a top roped climb
can either be from the
top of the pitch or the
bottom. Climbs can be
led, then top roped or
protected by hiking to
the top and fixing the
anchor.
Trad or
traditional climbing
requires a leader to
place his own
protection, rather than
merely clipping into
bolts. The term gained
popularity in the late
1980s with the
development of sport
climbing routes (climbs
that were pre-protected
with bolts).
Traditional rock
climbing involves the
use of ropes and
temporary anchors to add
a degree of safety to
the sport. As the lead
climber ascends the
rock, he or she inserts
an assortment of metal
anchoring devices, known
collectively as
protection, into the
cracks and crevasses at
points that may be
anywhere from a few feet
to several yards apart
depending on the
difficulty of the route.
With the protection
securely in place, the
climber then uses a
carabiner to attach the
rope. Once the rope is
clipped to a piece of
"pro," the belayer below
is responsible for
tending the rope and
stopping the climber in
the event of a fall.
Undercling A hand
hold which is upside
down and is used by
pulling up against it
instead of pulling down.
Whipper A fall,
usually a very long one.. |
|
TOP |
|
|
| |
|
|
 |
 |
 |
|
|